Varicam LT Firmware 20.42 adds support for FCPX file handling

IMG_4768I can confirm that the Panasonic VaricamLT firmware 20.42 fixes the MXF issues that prevented AVC-Intra 100 footage from being recognized properly.

Prior to this update, the only 1080 footage that FCPX would see was the ProRes HQ files that the LT generates.

Still no support for the AVC-Intra LT codec, needed for off speed frames above 60p.

This update now allows the use of FCPX and older P2 cards to record 1080p footage in AVC-Intra and ingest properly. I have quickly tested E-Series and R series cards and both appear to work without issues.

Here is the full release note:

Ver 20.42-00-0.00

Addition of RAW output function is planned for the update in the future.

New Features

  1. Improvement in AUDIO UI
    Direct Volume Control function added
    Level Meter Display function added
  2. Support for ProRes Recording in Interlaced Mode
    When FREQ = 59.94i / 50i is set, recording is possible using MAIN CODEC = ProRes422 HQ.
  3. Support for AVC-Intra100p
    Using MAIN CODEC = AVC-Intra100, recording is possible with FREQ = 59.94p / 50p / 29.97p / 25p / 23.98p and MAIN PIXEL = 1920×1080 / 1920×1080 CROP.
    At the same time, recording on F series P2 memory card is possible in spite of VFR = ON (with any setting value for fps) when MAIN PIXEL = 1920×1080 is set.
  4. Additional Lens Compatible with EF Lens Mount
    http://pro-av.panasonic.net/en/varicam/lt/ef_lenses.html
  5. Additional Function to store CDL / LUT on SD Card
  6. Additional function to beep when operating REC button
  7. SURROUND VIEW function added to VF
    A menu item is added to display the outside of effective area on the viewfinder screen. (SURROUND VIEW is also displayed on the VIEW screen of control panel.)
  8. Support for Proxy AVC-LongG6 24.00p recording

Improvement

Multi-editor multi-location FCPX workflow — Felipe Baez

How many times have you faced a problem? I guess most people have some sort of issue they need to fix on a daily basis. What do we do? Some of us prefer to ask other people, others prefer to google it first to see if that question has been asked before and if someone has already answered. No matter which way you do, one thing is a fact, if no one has figured out something yet, someone will.I work in a multi-editor multi-location environment, across 5 different cities in 4 countries. With multiple editors in each locations, our team produces something between 5 to 12 hours of live broadcast content every day, all corporate, mostly internal but some external as well. We have to edit some of those broadcasts into shorter segments to be shared inside the internal “youtube”, be used by the numerous marketing teams or to be used in a later broadcast as a roll-in.Every day my team of video editors receives at least several new project requests. These can vary from simple edits as the ones mentioned on the previous paragraph to much more complex, full production type of projects, where we’ll script, storyboard, shoot and edit. We are basically a production house. It’s common for an editor to be working on 5 to 8 projects at any given time, with customers all around the world and almost never sitting in the same room.It’s common that we would have a request coming in for an European customer by the middle of the day in Europe and to be delivered the next day. That’s when we’ll leverage the collaborative workflow, to have an editor starting the work in Europe, handing over to the Editors in the US and then handing over again to the European based Editors for final delivery, or any permutation of this example.In order to accomplish this without glitches you need: * Editors that understand and commit to the workflow * Shared Storage in all locations * A very good connection in between each colocation (to sync media)If you don’t have editors scattered across the world like I do, then you can have just a local workflow setup. On the next paragraphs I’ll share how I name my folders and how they work. Each project that we work on has a numeric ID assigned by the request system we use. This ID is has 5 digits and you will see it being repeated over and over.Disclaimer: Originally I developed a workflow based on an episode of MacBreak Studio where Sam Mestman and Mike Matzdorff share a very interesting way editors can get things from other editors without anyone having to stop their work or being asked. I then applied that workflow to what made sense according to my daily needs and made it compatible within multiple locations. In the past few days I decided to create a new workflow on my own, without having my specific team in mind, something simpler and faster that could be easily implemented. This is the one you’ll read about below, not the original one I wrote. I hope this can help you in some way or another.All editors in all locations have access to a network RAID (It’s connected through a Mac serving the storage over NFS on the network, but the best thing would be to have a Lumashare network storage) and this share has the same name in all locations, Video Editing. I’ll call our Editor John, Jane, Rick and Felipe. All macs have their internal 1Tb SSD drive partitioned into 1 250Gb main partition for the system and applications and a 750Gb secondary partition (all with the same name) with a folder called FCP Cache in the secondary partition (for caching).Inside the Video Editing share the editors will find the following folders:Location 11_Ingest    – 00001    – 000022_Projects    – 00001 – Project Name 1    – 00001 – Project Name 23_Archive    – 00001 – Project Name 1    – 00002 – Project Name 2    – 00003 – Project Name 3    – 00004 – Project Name 4Location 21_Ingest    – 00003    – 000042_Projects    – 00001 – Project Name 3    – 00001 – Project Name 43_Archive    – 00001 – Project Name 1    – 00002 – Project Name 2    – 00003 – Project Name 3    – 00004 – Project Name 4The Ingest folderInside the Ingest folder the editor will create a folder with the numeric ID of the project he/she has been assigned to. All the media assets necessary for this project will be “dumped” into this folder. Depending on how the editor likes to work, they can organise the assets inside it as they will, and then import everything as keywords on FCPX.The Archive FolderContains everything from a project, Libraries, Media, exports. Folders are created automatically (to be explained later). The sync profile that copies from the Project’s folder to here is a “A+>B” (Backup mode, doesn’t track deletions)There’s a second sync tasks (AB) that copies everything inside the folder from one location to another, but doesn’t track deletions.Projects folderThe editor will create a folder for the project that has the numeric ID and the name of the project. Inside the folder they will name the Library the same way, appended by their name (Examp

Source: Multi-editor multi-location FCPX workflow — Felipe Baez

Week 1 with the Varicam LT

P1320420

Art Aldrich operating the Varicam LT at the KPMG WPGA Championship

When Panasonic released the Varicam35, it got my attention. The camera had a great look and the feature set was impressive. I couldn’t justify the expense of that camera, especially since I was invested in EF glass.

I was ready to move to a 10 bit camera system, and looked seriously at the Canon C300 MKII. It had many of the features I wanted, but there were a few drawbacks. Mainly that I would have to move to CFast cards.

Flash forward to February 2016. Panasonic makes a surprise announcement that a new Varicam (LT) was about to be released. I decided to wait on a camera purchase until after the NAB show.

On paper, the camera seemed to offer everything I wanted: EF lens mount, optional PL mount that is user swappable, 4K recording, and up to 240 frames per second. To tie it up in a nice bow, the 16K base price was right where I wanted to be.

My concerns where mainly about the memory cards, and whether I would be able to use my collection of older P2 cards, mainly R and E series. The short answer is yes, in 1080p recording, I can use my existing cards.

The timing was right, and I decided to pull the trigger on 3 units. We went with the complete kit with PL and EF mounts, ENG style shoulder pad, EVF and Express cards. I will use these to replace our C300’s and older P2 cameras.

The cameras were ordered through AbelCine in NY, and we received them one day before a big 10 day shoot at the KPMG WPGA Championship at Sahalee Country Club near Seattle.

IMG_4770

Olympic Gold Medalist Shawn Johnson interviewed for event title sponsor KPMG with Varicam LT and cine-style 30-300 lens.

Without much prep time, we jumped in with a mix of Canon photo glass and Cine glass on our three cameras. Out of the box images were brilliant, just using Scene 1, REC709 with no grading.

We even made use of the 240fps recording to shoot some player hero shots, which impressed everyone who watched it.

There were a few wrinkles, like trying to kit out the cameras for 19mm rod support and replacement top handles. The Wooden Camera kits worked great, the Zacuto kit didn’t work with Panasonic’s EVF (thanks FedEx SameDay).

Also, NLE support for the new codecs is still in beta, so we were forced to use our new ExpressP2 media and shoot ProRes HQ. That allowed us to work in FCPX without issue. We later discovered that 4K AVC-Intra works just fine with FCPX.

In order to shoot between 61-240fps, we needed to shoot in a new codec called AVC Intra LT. The LT codec required us to use Davinci Resolve to convert the clips to ProRes. I hope this is fixed with a software update soon.

We even put the proxy record functionality to work in order to supply multiple networks with our footage at the same time. Using a simple SD card, I can record a full raster 1080p picture with a LUT applied at the same time my main recording occurs.

Overall, we are very pleased with the cameras, and look forward to exploring it’s features deeper as we go.

Live From Alaska, It’s the Iditarod


This slideshow requires JavaScript.

The Iditarod Trail Sled Dog Race takes place in Alaska, on the first Saturday in March. The 1000 mile race, known as The Last Great Race™, starts in Anchorage and transverses through the Alaskan Interior, to the edge of the Bearing Sea in Nome. The race will take about 9 days for the winner, and up to 14 days for the last team to complete. With a worldwide fanbase, the Iditarod.com website is the natural home for race coverage. That coverage includes blog writers, photographers, and a broadcast video team. This year marks the 44th running of the event.

Of the 10 years that I have been involved with the video production side of the race, this year proved to be the most ambitious. We launched a live streaming video component to the coverage that has never been attempted before. Our goal was to provide live video coverage of the race leaders in every checkpoint. This was challenging for several reasons, one being the lack of infrastructure along the trail, and the second biggest factor being limited resources. The Iditarod Trail Committee (ITC) hosts the race, and operates as a Not-For-Profit entity. Every expense is scrutinized carefully.

My plan was to build a small studio setup in Anchorage at the race headquarters, the Lakefront Hotel in Anchorage, and create a live news channel with former mushers Joe Runyan and Danny Seavey as hosts. The show would “break in” for race updates and live video as necessary, 24 hours a day.

This was going to be a two man operation at best with some volunteer help, and likely a one-man show most times. Everything had to be small, lightweight and flexible enough to work in multiple scenarios. The gear I picked needed to accommodate all of these goals.

The Studio Setup

At the heart of the production would be my 15” MacBook Pro running Telestream’s Wirecast 6. I have used this software before to combine two live GoPro’s that hang on the Burled Arch at the finish of the race. I knew the software could handle the task, but I had never used the full feature set of the software before. I would be the weak link.

For cameras, I knew wanted 3, maybe 4 angles. GoPro’s were an option, but on the wish list was a Pan-Tilt-Zoom (PTZ) setup to allow me to run the studio alone. Plan A was to rent some Panasonic HE60’s and a RP120, but I wrangled some HE130’s from Panasonic to test. The HE130’s were light enough to mount on Matthews light stands with a Noga ball head (in case I needed angle adjustment). This would save on weight and additional cost of tripods. Another big benefit is that the HE130’s can be powered and controlled via a single ethernet cable (POE+). This would make the setup cleaner and simple.

The cameras were fed into an AJA IO 4K box connected to my 15” MacBookPro. Using AJA’s software, I configured the box to pass 4 distinct HD 720p signals into Wirecast. This was key to keeping the footprint small and manageable.

For audio, I used an existing Allen & Heath Zed10 from my edit suite. A little big, but great sound, and could handle 4 mics.

I just picked up a BlackMagic VideoAssist prior to the race, and brought it along to serve as my video monitor/recorder. An AJA T-Tap provided the proper outputs from Wirecast. A Livestream Broadcaster was the encoder engine to the CDN.

Lighting was tricky, knowing that i needed to keep it small. The original plan was to shoot on an outdoor patio, so HMI’s were the only choice. I had a Joker 400/200 kit to use, but wanted something else. I had rented a Westcott FLEX LED 1×3 from LensProToGo and was so impressed with the output that I purchased my own Westcott 1×1 travel kit with two panels. It’s a complete kit in a small travel case that includes batteries, dimmers and stands. The whole kit weights 50lbs and I was very impressed with it.

Take to the Sky

One of the most exciting and challenging parts of this year’s Insider coverage was the live video from the checkpoints. Never, outside of the state of Alaska, has our audience experienced live video from the checkpoints. There are many reasons for this, but the main issue is that satellite coverage in Alaska is not great, and the throughput on small dishes is limited. There are no roads between many of the checkpoints on the Iditarod trail, so everything needs to be flown on bush planes. Think small and light.

This year, KTVA, the broadcast partner of the Iditarod arranged for a 24” dish from ViaSat, in the form of their Pro-Portable data satellite. This Ka band unit packs into a small flight case and can delivery upload speeds of 20Mbps. These speeds are theoretical, and in Alaska, we were planning on 6Mbps upload max.

The idea was to fly this dish ahead of the race leaders, and push a live stream back to our studio in Anchorage. Since the ProPortable would only have reception for the first part of the race, we planned to share KTVA’s two 1.2m flypacks for the second half.

In order to get the video back to our studio, I employed a Teradek Cube with a MPEG-TS license, which allows the cube to stream back to a cloud server called Sputnik. I setup Sputnik on the Amazon cloud, and could then pull streams directely into Wirecast with the free Teradek StreamReader plugin.

The tricky part was using the flypacks. These units are beamed into the KTVA facilities in Anchorage. Using a Mac Mini and an Ultrastudio recorder I could receive a signal from master control. Using Wirecast and Wowza Streaming Engine software running on the Mini, I was able to transcode the video and re-route it to Wirecast as an input. This was something that we had not planned for, and we worked it out thanks in part to the flexibility of Wirecast.

This was a huge breakthrough for race fans, and we streamed hours and hours of live cameras from the Alaskan Interior, which has never been done before.

The devil’s in the details

I have worked briefly in news when I first graduated college. I did not mind the pace, but found a more comfortable existence in production. I should have paid more attention to IFB’s and satellite windows, because I was in for a world of hurt. Let’s just say that I have a new respect for the gang in news production.

One Last Hurdle

We have been using Livestream as our content delivery network (CDN) for many years. Their pricing model in the past has been reasonable, with no per-user fee. Reliability has always been good, but this year Livestream experienced a major service outage right around the time of our finish. In order to keep our live video up, we switched the YouTube encoder on in Wirecast and was able to service our fans for about 4 hours until LiveStream was back up. Again, Wirecast saves the day.

Big time production, small footprint

Overall, the production was received well by the fan base. The equipment functioned as planned, and my main issues were mostly human error by myself.

When I think about what this team achieved with a few Macs and some software, compared to what would have been needed even 5 years ago, it is simply amazing.

Black Magic Video Assist: First Look

While I do have some Black Magic gear in my collection, my track record with their products has been spotty. Generally I have found that if a BMD product does not work out of the box, then it will never work for me.

side connectors When I first heard about the BMD Video Assist, I though here was another cheap on camera monitor with some recording capabilities. I was very happy (and still am) with the two Odyssey 7Q’s I own from Convergent Design. But after some though, I think the BMD Video Assist has a place. Allow me to elaborate.

Proper Positioning

For my purposes, I am thinking of the Video Assist as a ProRes recording with a confidence screen. In that vein, there is a lot to like. The unit can take SDI or HDMI, and record 10 bit 1080p in Apple ProRes HQ, ProRes, ProRes LT, or ProRes Proxy. It has built in dual tray battery unit that uses Canon LP-E6 batteries like my 5D MKII, and will charge those batteries when the unit is plugged in. But for me, maybe the greatest strength is that the Video Assist records on SD menory cards, which are very inexpensive these days. The cost per Gb is about 40 cents vs 80 cents for an SSD solution.

Nuts and Bolts

connectionsThe Video Assist is a 5″ touch screen, with a native display of 1920×1080. It has SDI in and out using mini lemo connectors, as well as full size HDMI in and out. There is a headphone out jack on 1/8″ mini, an SD card slot, and a AC input on the same side.

There are three 1/4-20 holes on the top and bottom of the monitor for mounting, as well as a kickstand for propping the monitor upright.

With the 1.1 firmware, the unit can display zebras from 75%-100% in 5% increments. There are also on screen guides for HD action and title safe, 4:3 protection, and film guides for 2.40, 2.39, 2.35, and 1.85

The unit ran for more than 2.5 hours on a pair of LP-E6 batteries in record mode.


A Few Issues

The first problem I ran into was simply trying to set the proper date and time. Whatever I tried, the parameter would not stick. A quick trip around the interweb confirmed that I was not the only one with this issue. Not the end of the world, but, you know…

sd-cardsSecondly, the Video Assist is particular about SD cards. Not just any card will do. Proof positive when I tried a 32GB Panasonic gold card that worked fine for my AF100 back in the day. the Video Assist would not even recognize it. I later received a Transcend 64GB card from Amazon that worked fine at ProRes LT (did not try other levels yet). Black Magic recommends at least UHS1 cards for HD. Read the list here.


Summary

Overall, I think the Video Assist will suit my purposes well. I do not intend to use this for on set picture evaluation, as I stated earlier. I will continue to use my Odyssey 7Q for that.

I would love to see a way to add Metadata to the files, or at least have a user definable naming convention.

Instead of a Histogram, I would like to see a waveform, which is a more appropriate tool for video pros.

I plan to use the Video Assist as part of my live stream kit to record the output of the production pre-encoder. It will make it’s debut during the 2016 Iditarod Sled Dog Race. Watch for more  updates then.

Lexar HR2, The ultimate DIT offload tool?

I like to pride myself on staying up on the latest gear, but somehow Lexar slipped the HR2 by me.

Lexar HR2The HR2 is a four slot docking station that uses USB3 modules and has a Thunderbolt2 interface (and USB3) on the back. Lexar offers several modules that read all types of media like CFast, Compact Flash, SD, MicroSD and two SSD modules. You can pick and choose the modules that suit your needs. I suppose that you could daisy chain multiple HR2 units for mad offloads although I have not tested that.

I configured the dock with 2 x Compact Flash readers, one SD reader and a MicroSD reader.

LRW300UOne might ask why spend the extra cash when one might own existing readers? For me, there are two reasons that make this desirable. First, when I am working in the field, my 15″  MacBookPro serves as the offload station. With two Thunderbolt and two USB3 ports, I am always swapping out devices. I have tried carrying port expanders like the OWC Thunderdock, but that has it’s own issues.

Secondly, and for me, more importantly, the HR2 allows me to offload many cards simultaneously. This can be a tremendous time saver. My dual-c300typical shooting setup is a pair of Canon C300’s and an audio recorder. Now I can offload both A & B Cams and audio at the same time. There is nothing slower than a backup at the end of a shoot trying while packing gear to catch a flight.

In my initial tests, the HR2 on Thunderbolt has enough bandwidth to allow for all transfers without penalty. When compared to my dual USB3 reader, CF cards offload about the same time, but the MicroSD cards are much faster in the HR2. More than twice as fast!

The hub requires power (included) and comes without any modules for about $170. The modules I purchased (street price) included the CF card reader (CFR1) for $24, the SD reader (SR2) for $22, and the MicroSD reader (UR1) for $40. Grand total of $278. Other  modules (list price) include the Thunderbolt CFast reader (CR2) $128, a 256GB SSD (DD256) $151 and a 512GB SSD (DD512) $216.

IMG_3924 IMG_3922The modules can be used without the dock too. Most use USB with the exception of the CFast reader which can be purchased with Thunderbolt or USB3 connectivity.

Lexar SR2 and MicroP2 cardOne nice surprise I found with the SR2 SD reader is that it will read MicroP2 cards (SD UHS-II) at full speed. I had previously discovered how slow the MacBookPro’s internal SD reader was.

MicroSD Cards: Choose the right one for the job

More and more of my gear uses the MicroSD format cards, mainly my collection of GoPro Hero4‘s and my Inspire1.

I have noticed that some cards work better than others for certain situations.

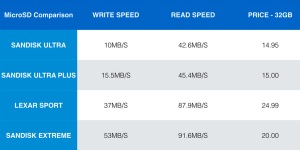
For example, in my Inspire1, the best card is the Lexar Sport, while doing 120FPS in 1080p on my Hero4, the SanDisk Exteme works best.

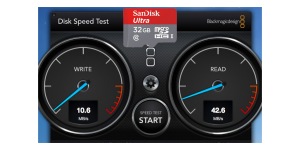
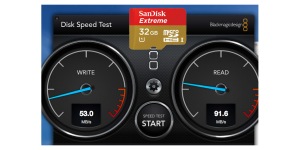
I decided to speed test all the cards to get the real world performance.

ComparisonLexar-Sport SD-Ultra SD-UltraPlus SD-Extrene

For timelapse, all the cards work well, but the SanDisk Extreme has the best performance for a few dollars more.

I do like the small reader that Lexar ships with their cards better than the MicroSD adapter than SanDisk Provides.

Major speed boost to my P2 workflow

I have been a long time user of the Panasonic P2 format, going back to the days of the HVX200. There have been numerous improvements to the cameras, media and offload tools over the years, but the biggest change to date may have been the move to the MicroP2 card.

microp2The MicroP2 card looks like an SD memory card, but is designed for high throughput. When used in my PX270 camera, the MicroP2 card is the only way to record 1080p60, a full-size P2 is just not fast enough.There are more pins on the card itself to facilitate moving the data.

Another nice feature of the SD form factor is that I can pop the card right into my Mac for easy offloading. I never though about the time it took to offload the media since it was a background task and not on the forefront of my mind.

When I upgraded my main edit station to the MacPro last year, I lost the built-in card slot. Since the MicroP2 card did not work in any external SD readers I  owned, I decided to pick up the Panasonic AJ-MPD1.

The unit is a two-slot, USB3, bus-powered drive, with a street price of around $325. My first 5 card reader was $2500!Micro P2 Reader

Here is the part that surprised me. This unit rips through the offloads at blinding speed. I am seeing a 5X increase over the built in reader. I even ran the tests twice just to make sure. Enough said.


OWC Thunderbolt2 Dock: mini review

Offload StationI have been looking for a dock for my field work centered around my MacBookPro, mainly offloading and some light editing.

Since the last Retina MBP ditched the firewire and ethernet ports, I have been forced to use dongles to gain access to these connections. The rub there is that there are only two USB3 ports, and two Thunderbolt2 ports. Take one TB port for Firewire and one USB for ethernet and it becomes harder to connect everything.


Enter Other World Computing’s new Thunderbolt2 dock. It offers 5 USB3 ports including two that offer power forOWC TB2 Dock higher draw devices, ethernet, analog audio in/out, Firewire800, and HDMI – all off 1 TB2 port. Sounded perfect for what I needed, so I ordered immediately.

It was nice to see a new product being offed that is actually available at that time. No need to pre-order. I received it in about 2 days and set it up right away.

No love for OWC SSDMy first task for the dock was to offload some content on an OWC SSD bus powered drive to a Pegasus raid. No problem, I thought, just plug the drive into the high-power USB3 ports and away we go. The copy started, and then about one minute later the drive ejects without warning and I get a low-power on USB message. I think this can’t be right, as I plugged into one of the two powered ports. I double check my connections, and make sure the power is connected. I try again with the same result.

After plugging the drive in directly to my Mac, I was able to copy, so a call to OWC was in order.


The call was answered after about a 5 minute hold, and after a brief conversation, the tech tells me that the OWCIMG_3371
SSD drive pulls too much power for the port, and that it will not work unless I buy a power supply for the drive.

This to me seems like a major mistake. Since OWC includes a power supply with the dock, I do not see a logical reason to have a low power warning. The tech did say that other devices should work, but for my needs, a big fat NO.

Aside from this issue, the dock does provide a useful array of connectivity, and will likely stay in my bag.

Week One with my DJI Inspire1

Inspire1 on the included road case, waiting for flight.

Inspire1 on the included road case, waiting for flight.

I took delivery of my DJI Inspire1 on Monday, tested it briefly on Tuesday, and shot a job with it on Wednesday. I thought I would share my experiences.

First, the backstory. I have owned several DJI Phantoms, starting with the Phantom 1, and my main craft prior to the Inspire1 was the Phantom2 Vision Plus. The camera was the weak link. My main use for aerials is shooting b-roll on golf courses.OTEK's Phantom2 Drones

I ordered the Inspire1 immediately after watching the press event in November. I first ordered the single controller model from B&H. I was on the fence about ordering the dual controllers so I cancelled by B&H order and placed an order with Dronefly.com for a dual setup and extra TB47 battery about a week later.

I was very excited to be in the first batch, since I had a golf shoot scheduled for the first week of January. The timing did not work out, but I was anxious to test.

The case that was included is nice, but maybe not for air travel or shipping. Jury is out on whether I get a Pelican or not.

The controller is awesome, with buttons for video record and photos right at your fingertips. I can now keep my hands on the controller, not the iPad during flight.

The integration of Lightbridge is fantastic. I had previously purchased this for my P2V+, but the setup was a bit awkward and I could not use the iPad for video display. Now it is a complete turn-key rig. One issue I had with the Lightbridge was using an iPad Mini 1, which is not powerful enough to stream the video. Once i switched to a new iPad Air2, everything was great.

The aircraft itself is large, much larger than a Phantom. It feels well built, and looks impressive and intimidating at the same time.

The Nitty Gritty

So how does the quality of the new camera compare? Better than I expected. I have used both the Vision+ camera and a GoPro Hero4 Black on my shoots. The Hero4 was much better than the Vision+ camera, but it lacked an easy way to view live video and control the settings once in the air. The Vision+ was “good enough” for most things, although it always left me wanting a little more.

The Inspire1 camera offers great video quality, perhaps better than the Hero4, with all the control that I could wish for. Want to play back a shot? No problem, just click play and it streams to your iPad. You don’t even need to bring the unit down.

The App apps-side-x-sideis very nicely designed. Much nicer than the Ground Station App that I used with the Vision+.

Oh The Drama

In my past dealings with DJI support with my Phantoms, I would say that my expectations were low with respect to service. After all, the Phantom2 was a sub $1000 drone from a Chinese company with little to no American presence. There was more  peer-to-peer support via message boards than from DJI directly.

With the introduction of the Ronin, I noticed an appearance of change (since I did not buy a Ronin, I cannot speak of their new support). With the Inspire1, I notice the same commitment to make the support better.

The first drama came when Mark Taylor posted a video of his Inspire1 crashing into his garage using auto takeoff. What followed next was a series of posts, second hand information, and a wild frenzy about grounding all Inspire1’s until issues are worked out.

I can say that I tried to reach the Inspire1 support team via live chat, and was told to leave my info and someone would call back in an hour. That call never came, ever. I called and waited on hold for about an hour. I did speak with a knowledgable english speaking person, who was polite and somewhat helpful. There is still a long way to go for pro level support.

I will post some video soon, so stay tuned.